Configuring ARES for a military unit
This tutorial involves using many system commands. Make sure you've skimmed the Command line basics tutorial or you won't know how to run them.
ARES is designed to deliver a quality experience for combat out-of-the-box. It keeps novelty features like chat filter and personalities quarantined in scripts that are asleep (they're literally set to "Not Running") unless they are required. However, there are further steps you may take to trim these features entirely and to make doing battle more nuanced.
Depending on your main controller model, some of these steps may have already been done for you by the bundled Differentiation script. See ARES Controller Info for more information.
- Obtain ATOS accessories. The most basic thing any combat unit needs is a gun and a repair tool. There are many fine items and shields available from Nanite Systems stores in-world, or you can search the Second Life Marketplace for "ATOS".
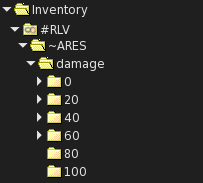
- Set up damage folders. ARES uses every opportunity it can to take advantage of the RLV SharedWear system (items in the "#RLV" folder). One of those uses is in representing damage on your avatar. If you create this folder structure in your SL inventory:
 ...Then ARES will be able to automatically add and remove these folders to match your current damage state. The 100 folder is only displayed while you're at full integrity; the 80 folder is when you're between 80% and 99% integrity, and so on. You could, for example, add smoke puffs to some or all of the lower folders; just remember that if you want an item to appear in multiple stages, it needs to be in all the applicable folders.
- Buy and install ARES WARRIOR. This extension will be available from the Nanite Systems main store in Eisa when it is ready. WARRIOR allows you to experience differential damage to various hit locations, and provides a paper doll showing the health of each body part, as well as an RLV-based weapon switcher. Make sure you do this before removing the wiz program (below), as the WARRIOR setup process requires it.
- Change security settings to remove guest prompts. We didn't cover Rules in the Tutorials, as these are an advanced Security topic, but they are relevant to military units. Open the access control... > rules... > common access rules... menu and click on all of the entries that say "2" (chat, device, local, menu, and navigate). They will turn to "3". This means that guest users cannot do any of those activities, eliminating consent prompts. Military units generally aren't available to the public! (Don't worry about the arouse, persona, or vox rules—we'll be removing those further down this page.)
- Remove personas and chat filters. The following files pertain to these features and can be deleted safely from user memory (link 3):
- The scripts persona, vox, and filter
- The notecard vox.db
- Any files with names ending in .p
To access user memory:
- Make sure safety bolts are disabled (policy bolts off)
- Open the Edit (Build Tools) window by pressing Ctrl-3
- Enable "Edit linked" with Ctrl-Shift-E
- Select the model badge of your ARES HUD (bottom middle of screen)
- Switch to the Contents tab
- Drop unneeded remote sources. The file system source ns-persona is only relevant if personas are installed. Since it contains many files, keeping it active slows down filesystem refreshes. It can be removed with the system command fs source remove ns-persona.
- Remove the wiz application. This pre-installed application is used for running the Setup wizard. Depending on your level of familiarity with ARES you may no longer need it.
- Run ax remove wiz while in Eisa, or another region with ARES Xanadu service.
- Remove the filesystem source setup, if it is still active, with fs source remove setup
- Delete the notecard setup.as, as it is no longer useful.
- Clean up the menus. Remove "chat filtering" and "personalities" from the main menu. Run the following commands, one after another:
- db delete m:main.e.2
- db delete m:main.e.0
- db drop m:persona
- db drop m:vox
- db drop m:vox-in
- db drop m:vox-out
- db drop m:vox-in-detail
- db drop m:vox-out-detail
- db delete m:rule-common.e.8
- db delete m:rule-common.e.6
- db delete m:rule-common.e.0
Some of these steps will be reversed when you perform an OS update. In particular, the deleted files will be reinstalled. Later on, we'll offer special shell scripts that can automate the messier parts of this configuration process.
Previous Tutorial: Shutting down and removing ARES
Next Tutorial: Configuring ARES for a sex robot